Water stains on the ceiling can be unsightly and difficult to eradicate. Before attempting to fix a water stain on the ceiling, you must first identify the source of the water. This could be a plumbing issue, such as a leaky pipe, or perhaps a faulty appliance or roof leakage. Identifying the source of the water stain on the ceiling can help you prevent future water stains, as well as develop a plan to reduce the damage already done.
How to fix a water stain on ceiling
The first step in preventing water stains on your ceiling is to check the roof for any damage or leaks. Look for signs of wear and tear, such as missing shingles, cracked tiles, rust spots or any other breaches that could be allowing water to enter the home. Additionally, inspect the attic for potential sources of moisture and pooling water, such as condensation build-up or a persistent draft. If you’re not sure what to look for, it’s best to contact a professional roofer or handyman and have them come take a look.
If your roof appears to be in good condition but you can still identify occasional water stains on your ceiling, you might want to then look around external facing walls and windows for possible sources of moisture infiltration leaking from outside. Make sure all exterior caulking is intact and all crevices are properly sealed. Additionally, pay attention to any plumbing fixtures that may be connected to outdoor hoses or those located in enclosed external walls. Again — if you’re not confident assessing these risks yourself, it would be wise to call a qualified professional who specializes in detecting moisture issues from the outside of your home.
Inspect the plumbing for any leaks or signs of damage
To determine the source of a water stain on your ceiling, take a few moments to do an inspection of the plumbing. First, inspect the pipes and valves connected to your sink, bathtub and washing machine (if applicable). Look for any signs of visible damage or discoloration such as corrosion. Next, turn off your main water line and look for evidence of leaks throughout the house. If you find none, it is possible that the water stain is not coming from any of the usual sources but could be due to condensation from an air conditioning unit or another appliance that requires regular maintenance. Check for signs of mold or mildew near these appliances as well as in other areas such as basements or attics. Finally, inspect any ceiling fixtures such as lights or fans for any signs of wear and tear which could indicate a potential leak from above.
Inspect the walls and ceiling for any signs of water damage
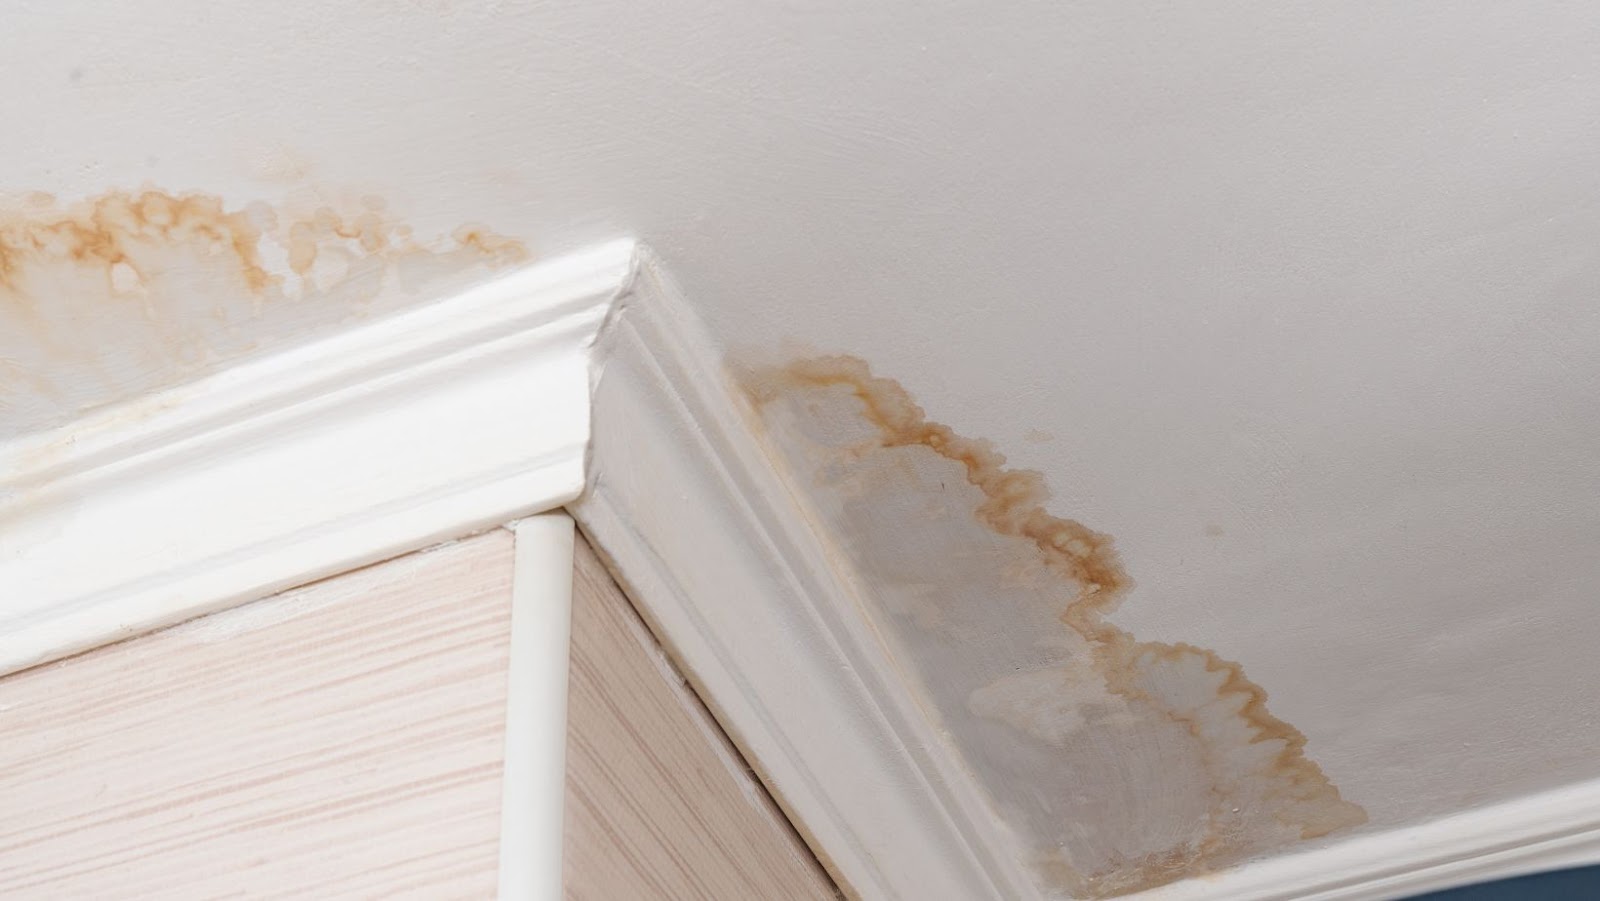
When inspecting your walls and ceiling for signs of water damage, look for stained, discolored or chipped paint. Stains may appear on the ceiling in a variety of colors that range from tan to blackish-brown depending on how long the water has been affecting the area. Use a ladder or step stool to examine any part of the ceiling that is too high up to peer into easily.
In addition to observing paint staining and discoloration, you might want to look out for peeling or bubbling wallpaper or plaster. These are indications that there could be an issue with your walls/ceiling, so it’s important to get it checked out right away by a professional if you do find any excessive discoloration or flaking material in these areas. Take pictures of any suspicious markings and make sure that you document all affected surfaces in order for an inspector or handyman to help make an accurate assessment of where and why there is a water stain present on your wall/ceiling.
Clean the Ceiling
Water stains on the ceiling can be unsightly and embarrassing. If you have water stains on your ceiling, the first step is to clean the affected area. Cleaning the ceiling can help remove any dirt, dust, and algae that may be causing the stain. It will also help to make the ceiling look cleaner and brighter. There are a few methods you can use to clean the ceiling, and we will discuss them in this article.
Use a damp cloth to gently scrub away any dirt or debris
Using a damp cloth is an effective way to gently scrub away dirt and debris on your ceiling. Be sure to follow any product-specific instructions when choosing cleaning tools or materials. It’s important to only use these items in a well-ventilated area as fumes from these materials can damage your respiratory system if inhaled.
For tougher stains, such as those caused by water or smoke, it may be necessary to use a specialized chemical solution. Avoid abrasive cleansers when dealing with water stains, as they can cause further damage and make the stain worse. Aim for products with high alkaline levels, such as trisodium phosphate or a mild detergent solution. If the stain is still present after using this method, consider hiring a professional cleaner for more thorough treatment of the ceiling.
Rinse the area with clean water
When you’re cleaning your ceiling, it’s important to start by rinsing the area with clean water. This helps to remove any surface dirt and dust that may have collected. Be sure to use a soft-bristled brush that won’t scratch or damage your ceiling.
If your ceiling is covered with water stains, use a cloth, sponge, or special cleaning solution to remove them. It’s important to be gentle and patient as water stains can be hard to remove. Start at the bottom of the stain and work your way up, being sure not to spread the stain further up the ceiling. Once the stain is removed, rinse the area again with clean water. You may need to repeat this process if there are multiple water stains on your ceiling.
If you’ve run into a stubborn stain that won’t come out with regular cleaning solutions and methods, try using a mix of vinegar and baking soda paste instead. Make sure every last bit of it is wiped off before you move on though — leaving even traces of vinegar can cause discoloration over time!
Dry the area with a clean cloth
After you have prevented any more water from intruding, the next step is to dry all residual moisture from the area. You should use a clean and absorbent cloth or paper towels and gently pat the ceiling, working in sections until it is fairly dry. Be sure to keep pressing the cloth up against the surface to ensure that any lingering moisture is drawn out. The more moisture you can remove, the less likely it will be that a water stain develops. The process may take some time, as you want to make sure as much of the residual moisture is gone.
Repair the Ceiling
If you have a water stain on your ceiling, it is important to repair the ceiling as soon as possible. This will help prevent the stain from spreading further and potentially damaging the structure of your home. Fortunately, there are a few easy and effective ways to fix the problem. In this article, we will discuss how to repair a water stain on the ceiling.
Use a putty knife to scrape away any loose paint or plaster
After assessing the amount of damage to your ceiling, use a putty knife to scrape away any loose paint or plaster. Be very gentle and take care not to dig too deeply and risk loosening other completely intact surface materials since this could exacerbate the problem. Removing anything that is flaking or cracked can aide you in future repairs, so take care in this step. It may be needed to lightly sand areas that have been scraped before applying further repair materials.
If your ceiling has a texture, you may need to use a roll of painter’s tape to mask off areas around the repairs for protection against any spray or powdered textures used for re-texturing. Note that if some portions of the ceiling have sunken back more than 1/8 inch from the rest of the surface, you will likely need to apply a setting compound over the entire repair area before texturing it back up with a matching compound. This will help ensure long-term structural stability and cosmetic appeal in the repaired section of your ceiling.
Fill in any cracks or holes with spackle or joint compound
In order to prevent water stains on your ceiling, it is important to take a proactive approach and ensure that there are no cracks or holes in the ceiling. Filling in any cracks or holes with spackle or joint compound can help you achieve this.
It is best to begin repairing the area by cleaning away all of the dust and other particles that may have accumulated. Once the area has been thoroughly cleaned, you can begin applying either spackle or joint compound over the affected areas in order to fill in any existing holes and cracks. For larger areas of damage use joint compound – for smaller spots, use spackle.
Allow ample drying time for both products before adding additional layers of product if necessary. It’s important to sand down rough spots before priming and painting to ensure a smooth finish. After all repairs are complete, apply a fresh coat of quality paint that matches your ceiling color in order to protect it from further water damage and stains.
Sand the area to create a smooth surface
Before you begin the repair process, it is important to sand the area to create a smooth surface. Sanding removes any existing paint, joint compound or other debris that could prevent a strong bond between your new patch and the existing ceiling. Take your time and use medium-grit paper or a power sander to finish the job. After sanding, vacuum and dust the area thoroughly before applying any sealant or paint. This may require you to use a hand-held vacuum cleaner with attachments for reaching high areas.
Paint the Ceiling
When there is a water stain on your ceiling, one way to fix it is to paint the ceiling. This will cover up the stain and make the room look more presentable. Painting the ceiling can also help protect it from further damage. However, there are certain steps you should take to ensure you get the best results. In the following section, we will discuss the process for painting the ceiling and how to make sure the water stain doesn’t come back.
Choose a paint color that matches the existing ceiling
When choosing a paint color for the ceiling that matches the existing texture and pigment, you should try to get as close a match as possible. If you have a textured ceiling with multiple colors, then select colors that are similar to each other and pick out neutral tones with slight variations in them. Doing this will help to mask any visible water stains on the ceiling and ensure an even look across the whole surface.
To better match existing colors and textures, it may be necessary to mix paints of different colors together by hand. A more convenient method would be to buy sample pots of paint, which usually contain enough product to cover small areas without having to mix large amounts of paint yourself. Depending on the size of your project, one coat might be sufficient, but two coats are usually preferred for maximum coverage.
To recoat your ceiling correctly, take extra precaution when applying new paint over an old layer; you want all coats of paint applied in one direction for a smooth finish. For example: Paint in one round motion from left-to-right and then top-to-bottom for best results. This will help you reduce splatter from forming upon application and give you a professional end result every time.
Apply a coat of primer to the area
Before applying a coat of paint to the ceiling, it is important to apply a coat of primer. A primer helps provide an even and consistent surface for a quality paint job. Primers are available in water-based, low odor formulas and can be tinted to match your paint color if desired. Also, check the end label of your chosen surface cleaner for any specific surface preparation instructions; some cleaners may need rinsing off before priming.
Once you’ve selected a primer, grab your ladder, rags and stinky brush so that you can work on preparing the area for painting. Make sure that the ladder is stable and secure at all times; you don’t want to be wobbling around on it or risk toppling over when you reach up and out with those extra-long tools! Begin by lightly wetting a cloth rag with warm water and cleaning the entire ceiling area in circles, following any specialized drying techniques that may be recommended on your product label (in order to remove smudges or grease buildup).
Now, it’s time to apply primer! With a fresh brush or roller applicator, dip into your pre-mixed 40/60/100% ratio of wall sealer to water solution (be sure to mix thoroughly). Start at one side of the room and work towards the other –covering skylights as necessary – keeping an even 1/4 inch coating until completely saturated in the distance between two edges. Allow adequate drying time according to manufacturer instructions then lightly scuff with 220 grit sandpaper before applying the first coat of paint!
Apply a coat of paint to the area and let it dry
Painting is probably the best way to prevent future water stains appearing on your ceiling. Depending on the size of the area needing to be painted, you may want to use a roller or an edging brush. Before beginning to paint, mask off any areas that are not meant to be painted and thoroughly clean dirt, dust and grease from the surface.
When you are ready to start painting, first apply a coat of primer. This allows your topcoat (your actual paint) to adhere better and helps prevent peeling or blistering in the future. It’s also important that this primer is of good quality so it won’t yellow over time. After applying a coat of primer has dried (usually an hour), add a top layer of paint in your chosen color. Make sure that you cover all surface areas evenly with the paint for an even finish, and let it fully dry before adding additional coats if desired.
Prevent Future Water Stains
Whether you’re dealing with a water stain on your ceiling or you want to prevent future water stains, there are certain measures you can take to fix and avoid the issue. The key is to identify the source of the water and to make sure you take steps to stop it from happening again. Below, let’s look at some tips to prevent and fix water stains on your ceiling.
Check the roof and plumbing regularly for any signs of damage
It is important to check for any possible signs of damage in the roof and plumbing on a regular basis in order to prevent any water stains on your ceiling. Loose shingles, missing felt paper, and other deficiencies could lead to a leaking roof. In addition, older fixtures may cause leaks due to corrosion or worn parts. It is recommended that you inspect all your plumbing pipes and fixtures for signs of wear or corrosion if possible. If you notice any issues, it is essential that they are addressed immediately in order to sustain the integrity of your home’s plumbing system and protect it from further damage.
It is also wise to keep an eye out for specific indicators such as discolored staining appearing on your walls or ceilings which may suggest a leaky pipe within the walls or attic space. Additionally, take note of any hot spots felt when touching walls and floors as this might be indicative of a water problem. Taking prompt action with regards to either issue can help mitigate costly repairs down the line as well preventing future water stains from occurring.
Consider installing a water-resistant ceiling material
For ceilings in areas prone to water damage, an alternative to painted drywall is available. Water-resistant ceiling tiles are a good option for preventing future water stains from appearing on your ceiling. These tiles, such as USG Radiant Acoustical Ceiling Tiles, are designed to protect against moisture penetration that can lead to the growth of mold and mildew.
They come in various shapes and styles, allowing for both a decorative touch and enhanced protection from the elements. In addition to repelling water, these ceiling tiles also feature superior fire resistance and sound absorption qualities. It’s important to remember that even when using these specialty-made materials, regular maintenance is key in continuing your defense against water damage in the future. Following manufacturer’s instructions during installation is also essential for optimal results.
Seal any cracks or holes in the ceiling to prevent water from seeping in
As a preventive measure, it’s important to seal any cracks or holes in the ceiling so water is not able to seep in. This can be done with caulk or any type of sealant. Additionally, check for and repair any areas that may suffer from poor drainage, such as gutters and downspouts, as well as pipes, windows and doors.
Regularly inspect your roof for damaged shingles or other weather-related damage that could allow water to penetrate your home. If you have composite shingles on your roof, look for granule loss which can indicate an aging or deteriorating surface that should be fixed promptly.
Inspect skylights in your home during all seasons of the year, especially after heavy rainstorms. Make sure to clean out any dirt accumulation from the panes, seals and flashing if they are present — this will help keep your skylight waterproof and free of debris which can cause water leaks.
Lastly, make sure attic vents are clear and unblocked so air can run freely through them which will help keep moisture levels low in all areas of the house.